This is a short post to wish my father-in-law, my kids' Grandpa, a very very Happy Birthday from all of us here.
Happy Birthday! We miss you and we love you!
And here are the little ones with a little song:
Tuesday, December 1, 2009
Wednesday, October 28, 2009
It's Fall Time for Fall Recipes...
I have been sadly sadly lacking in my posts to my humble blog. With non-existent followers, I guess I didn't have the motivation I needed to keep this updated. I did also lose my baking groove during the late summer months. 80+ degree weather does not make for a good baking day. But, I know that is no excuse! I will be faithful and loyal to my steadfast readers (Where?!) and will start blogging again!
Speaking of late summer months, we have now progressed into lovely, cool, windy (especially today in the Bay Area), and ideal baking weather called Fall. This is one of my favorite times of year just because we are blessed with a cornucopia of apples of all varieties, and a very good reason to start working on all things pumpkin!
But first, I'd like to share a recipe that I found on Food Gal's blog last month for Babette Friedman's Apple cake. It is a very simple recipe that I thought kept the flavors of the apples as the main focal point of the delicate cake.
Ingredients used

Apple slices bathing in cinnamon, grated ginger and just a little booze!
 The Finished Cake! Time to dig in!
My family liked this recipe so much that I baked it two more times. Once with Jazz apples (delicious too!) and a second time with Gala apples. The cake came out great every time. But if you'll notice, the cake tastes a little different as you use different apples (obviously to some of us) but my family liked each cake as much as the last one!
Babette Friedman's Apple Cake
Babette Friedman's Apple Cake
(makes one 9-inch cake, about 8-10 servings)
Ingredients:
8 ounces unsalted butter, plus more for greasing the pan
1 1/3 cups plus 1 tbsp granulated sugar, divided use
1/8 tsp salt
2 large eggs
2 cups all purpose flour
2 tsp baking powder
4 apples, peeled, cored, and each cut into 8 slices (I used Golden Ginger apples, which seemed look like a Golden Delicious but has the tartness and crispiness of a Honey Crisp apple)
1 tablespoon Calvados or apple brandy (I used Grand Marni er instead. I thought the citrus-y flavor might be interesting with the tart/sweetness of the Golden Ginger apples)
1 tsp freshly grated ginger
1/2 tsp ground cinnamon
Preheat oven to 350 degrees. Butter a 9-inch springform pan, and set aside.
Combine 8 ounces butter, 1 1/3 cups sugar, and salt in the bowl of an electric mixer fitted with a paddle attachment. Mix until blended and fluffy. Add eggs and whisk until smooth. In a small bowl, combine flour with baking powder. Using a rubber spatula, gently fold in the flour-baking powder mixture into the butter-sugar mixture until thoroughly combined. Fold in about 1/3 of the apples, and spread butter evenly in pan*.
*Note: I changed the recipe here where I added the Grand Marnier, ginger, and cinnamon to all the apple slices before adding 1/2 of the apples to the batter. This way, I had some of these flavors and extra apple slices mixed into the batter.
In a large bowl, toss remaining apples with Calvados, ginger and cinnamon. Arrange apple slices in closely fitting concentric circles on top of the dough; all slices may not be needed. Sprinkle remaining 1 tablespoon sugar over apples.
Bake until a toothpick inserted into the center of cake dough comes out clean and apples are golden and tender, about 50 minutes (or longer)**. Serve warm or at room temperature.
Bake until a toothpick inserted into the center of cake dough comes out clean and apples are golden and tender, about 50 minutes (or longer)**. Serve warm or at room temperature.
**Note: I had to bake mine for about 1 hour and 15 minutes. The cake batter was too wet and just wasn't done enough to take out any sooner.
Adapted from the Food Gal, who adapted from Daniel Rose's adaptation of a December 2008 NY Times recipe
Wednesday, July 15, 2009
Special Ingredient.... Blueberry!!!!
It's that time of year when you walk into Costco with a grocery list and end up with about $20 more added to the bill because you couldn't resist the cases of fresh peaches, plums, and plastic containers of berries. I had no problems eating the dozen or so white peaches but what was I going to do with all those blueberries?
One of my colleagues reminded me that I still haven't brought in a blueberry cobbler, even though I've been teasing him with that idea for the last two years. I've never baked a blueberry cobbler. What recipe should I use? Should it have a streusel topping, or a biscuit one? Should I make muffins instead? Or try that blueberry boy bait recipe I saw on another blog? Too many choices and too little time.
So I found two recipes on Allrecipes.com that would work for me. It was a weeknight and I didn't want to do anything too fancy. But, which one should I do? Both??!!! Did I have the energy?
So the first one is the Very Best Blueberry Cobbler recipe. It was pretty straightforward and allowed for both fresh and frozen blueberries, which I had. I took some pictures but since I was baking in the evening, I couldn't figure out how to manipulate the lighting with my point and shoot for more natural lighting, so please bear with me. Another tiny detail I'll have to work around the next time I bake at night.
Here's a picture of the topping before I let it sit for ten minutes. Be sure not to overmix. 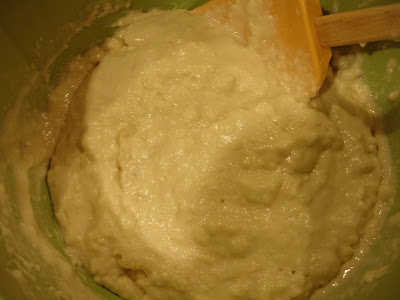 I also made a mini cobbler so that I can taste test it before taking it into work. The butter, sugar, vanilla and lemon juice has been added.
 I also made a mini cobbler so that I can taste test it before taking it into work. The butter, sugar, vanilla and lemon juice has been added.
Topped with cinnamon and sugar, the biscuit batter had "fluffed up" in the ten minutes I let it rest. I followed the recipe instructions and left some holes for the berries to bubble through.

The larger pie required a good twenty minutes more in my oven than the stated twenty five minutes in the recipe. But the topping came out slightly crispy on top and soft and fluffy inside. But like some of my past pie-making experiments, I had a little too much syrup-y juices on the bottom; like blueberry soup.


The second recipe was the Easy Batter Fruit Cobbler also from Allrecipes.com. I liked this recipe because it was really easy to make. Warm up the pie pan in the oven with the butter until melted, mix your batter up, pour it in, scatter the fruit on top and into the oven it goes!
Again, we have to taste test so a mini cobbler was made for this one too. I can't show my face at work with a less-than-acceptable-cobbler!! I'll lose my guinea pigs for my other baking experiments.

This recipe baked up much more quickly. The edges were slightly crispy and when scooped, the cobbler was much more solid.
 Here are the two cobblers next to each other.
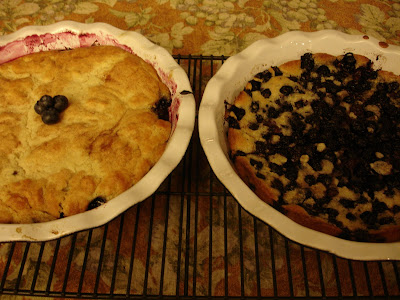 So the next day, I brought my cobblers in to work and labeled them A and B respectively. And to my surprise, I had some people love A, others love B and still others chose both. It seemed people who grew up eating cobblers with ice cream loved A, which was the Very Best Blueberry Cobbler. Others who liked the taste of the fresh blueberries liked B, the Easy Batter Fruit Cobbler.
 In the future, I will have to find another baker to "challenge" so that I don't have to do both myself but this was definitely a good experience for me. I have had many pie-baking disasters in my baking past and found the cobblers to be a great alternative!
Wednesday, June 17, 2009
Chipster Topped Brownies
When I first saw this recipe on many other blogs I was amazed that I had never seen any recipe like this before. It's the best of both worlds: chocolate chip cookies and chocolatey brownies all in one! I had to try it! So I decided to bake it to bring to my friend's bbq this past Saturday. I knew there would be at least two chocoholics there; me and my friend.
 Chocolates and butter... I had forgotten to coarsely chop the chocolate because I was too busy trying to take this picture...

But the chocolate melted after some patient stirring. I didn't want to overheat the chocolate.
 Then I mixed the eggs and sugar until they were creamy and thick.
I had read a few of the other blogs and found that some people baked the brownies for 15 minutes before adding the cookie dough topping. So after combining the melted chocolate and butter, in the pan it went and into the oven for its first 15 minutes while I made the cookie batter.
 My mise-en-place for da chocolate chip cookie batter... I used two different types of chocolate chips: semi-sweet and bittersweet for a total of 1.5 cup.
Da cookie dough. Looks a bit sticky and thick. I wasn't able to spread the batter at all onto my brownie mixture. So I dropped the batter by the spoonfuls over the top of the brownie hoping that the cookie dough will spread as it bakes.

Here's my pic honoring Alton Brown's oven shots from his Good Eats show. We're spreading, and puffing up too!
 And here we are cooling and falling back down to the brownie level.
 The finished goods!
Chocolates and butter... I had forgotten to coarsely chop the chocolate because I was too busy trying to take this picture...But the chocolate melted after some patient stirring. I didn't want to overheat the chocolate.
Then I mixed the eggs and sugar until they were creamy and thick.I had read a few of the other blogs and found that some people baked the brownies for 15 minutes before adding the cookie dough topping. So after combining the melted chocolate and butter, in the pan it went and into the oven for its first 15 minutes while I made the cookie batter.
 My mise-en-place for da chocolate chip cookie batter... I used two different types of chocolate chips: semi-sweet and bittersweet for a total of 1.5 cup.
Da cookie dough. Looks a bit sticky and thick. I wasn't able to spread the batter at all onto my brownie mixture. So I dropped the batter by the spoonfuls over the top of the brownie hoping that the cookie dough will spread as it bakes.
Here's my pic honoring Alton Brown's oven shots from his Good Eats show. We're spreading, and puffing up too!
The finished goods! My brownies took a good 20 minutes more in the oven than the 60 minutes called for in the recipe. The result was a slightly crispy edge but an almost cakey brownie but still dense with a nice chocolate flavor (I used Penzey's Dutch process cocoa powder, which seems more mild in flavor than say Valhrona's dutch process cocoa.) I liked eating the brownies and finding the different chocolate chips in the cookie part. I will definitely try this again with other types of chips.
Chipster-Topped Brownies
Ingredients For the Brownie Layer:
6 ounces bittersweet chocolate, coarsely chopped (I forgot to chop my chocolate. It just took longer to melt.)
3 ounces unsweetened chocolate, coarsely chopped
2 sticks (8 ounces) unsalted butter, cut into chunks
1 2/3 cups sugar
4 large eggs
1/2 teaspoon salt
1/2 teaspoon pure vanilla extract
1 cup all-purpose flour
1 cup walnuts, coarsely chopped (I left the nuts out. I'm a chocolate purist. Maybe next time.)
For the Cookie Layer:
1 1/4 cups all-purpose flour
1/2 teaspoon baking soda
1/2 teaspoon salt
1 1/2 sticks (12 tablespoons) unsalted butter, at room temperature
3/4 cup (packed) light brown sugar (I changed my mind and used dark brown sugar instead. I like the intensity.)
2/3 cup sugar
1 large egg
1 large egg yolk
1 teaspoon pure vanilla extract
6 ounces bittersweet chocolate, chopped into chips, or 1 cup store bought chocolate chips (I used 1 cup bittersweet and 1/2 cup semi-sweet.)
Getting Ready
Center a rack in the oven and preheat the oven to 350 degrees F. Butter a 9x13 inch baking pan, line it with wax paper or parchment paper and butter the paper. Put the pan on a baking sheet.
To Make the Brownie Batter:
Put both chocolates and the butter in a bowl set over a saucepan of simmering water. Stirring occasionally, heat just until the ingredients are melted, shiny and smooth. If the mixture gets too hot, the butter will separate from the chocolate. Remove the bowl from the heat.Working with a stand mixer, preferably fitted with a paddle attachment, or with a hand mixer in a large bowl, beat the sugar and eggs on medium-high speed for about 2 minutes, until pale, thick and creamy.
Beat in the salt and vanilla extract. Reduce the speed to low and mix in the melted chocolate and butter, mixing only until incorporated. Scrape down the sides of the bowl with a rubber spatula, then, still on low speed, add flour, mixing only until it disappears into the batter. Using the spatula, fold in the walnuts, and scrape the batter into the prepared pan. Set aside.
To Make the Cookie Dough:
Whisk together the flour, baking soda and salt.Working with the stand mixer in the cleaned bowl or with the hand mixer in another large bowl, beat the butter and both sugars together on medium-high speed until smooth and creamy, about 3 minutes. One at a time, add the egg and the yolk, beating for 1 minutes after each addition. Beat in the vanilla. Reduce the mixer speed to low and add the dry ingredients, mixing only until they disappear into the dough. Still on low, mix in the chopped chocolate.
Drop the cookie dough by spoonfuls over the brownie batter and, using a spatula and a light touch, spread it evenly over the batter.Bake for 50-55 minutes, (I don't know if it's my oven, but I had to bake my brownies another 20 minutes) or until the cookie top is deep gold brown (I had to cover my baking pan during the last 20 minutes to prevent the top from burning) and firm and a thin knife inserted into the brownie layer comes out with only faint streaks of moist chocolate. Transfer the pan to a rack and cool to room temperature.When the brownies are completely cook, carefully run a knife between the sides of the pan and the brownies, then invert them onto another rack, remove the paper and turn the right side up onto a cutting board. Cut into bars about 2 inches x 1 inch. (You can cut larger bars if you're serving cookie lovers with Texas-size appetites.)
Makes 24 servings.
Serving: Ice cream, whipped cream and creme fraiche are all great accompaniments, as is a generous drizzle of chocolate sauce.
Storing: Wrapped well or packed in an airtight container, the bars can be kept at room temperature for 2 days or frozen for up to 2 months.
Playing Around: The cookie top can be varied easily be swapping peanut butter, butterscotch or white chocolate chips for the chopped chocolate. You could even use all of them.
Wednesday, June 10, 2009
My son saw the picture and wanted Choco-ate cake....
I was surfing the net one Sunday morning a couple weeks ago when my son came into the office and immediately saw Jen Yu's (use real butter) picture of this recipe for Chocolate Stout cake. I believe she had gotten the recipe from Smitten Kitchen. Both of their blogs have beautiful pictures and very clear instructions as they put their cakes together. Please do jump to their sites for more Chocolate Stout cake inspiration, and of course, for the recipe.


 This was what was left a short time later. So much for watching my kids' diet. They both loved the cake. Smitten Kitchen's recipe called for a ganache glaze and use real butter paired this chocolatey cake with some freshly whipped cream. To keep the kids' mess at a minimum I left both options off. The kids didn't miss anything.
"Momma! I want choco-ate cake pu-ease!"
And his little finger points at the beautiful picture that Jen Yu posted. I had seen her post days before and thought, in passing, that I might try the recipe one day but my son made the decision for me that I would be baking that cake that day. Luckily I had all the ingredients including a can of my husband's Guiness Stout that I used in my version.
This was what was left a short time later. So much for watching my kids' diet. They both loved the cake. Smitten Kitchen's recipe called for a ganache glaze and use real butter paired this chocolatey cake with some freshly whipped cream. To keep the kids' mess at a minimum I left both options off. The kids didn't miss anything.The cake came out moist, not too sweet, and very, very tasty. It's now my Go-to chocolate cake recipe!

Wednesday, June 3, 2009
Belated Post from Mother's Day Baking Activities
On the morning of this recently past Mother's Day, it started better than expected. My husband brought me a cup of hot steaming Starbuck's coffee and the Sunday paper while I was still in bed and told me I'm appreciated.
After a few hours of false starts I decided to bake a batch of cookies. So Nick Malgieri's Peanut Chocolate Chip cookies from his Chocolate book was the first.
 Topping:
3 tablespoons Sugar 

After a few hours of false starts I decided to bake a batch of cookies. So Nick Malgieri's Peanut Chocolate Chip cookies from his Chocolate book was the first.
 This was how they looked after each ball is flattened with the bottom of a glass.
The baking itch was still there so I thought, why not bake another batch. My husband could bring it to his friend's house later. So I started the Vanishing Oatmeal Raisin Cookies from Quaker Oats... and then moved onto the Cinnamon and Sugar butter cookie recipe from the Mrs. Fields Cookies cookbook because I realized that my son didn't like either of the first two cookies.
Topping:3 tablespoons Sugar
1 tablespoon Ground cinnamon
COOKIES
2 1/2 cups Flour
1/2 teaspoon Baking soda
1/4 teaspoon Salt
1 cup Dark brown sugar, packed
1/2 cup Sugar
1 cup Salted butter -- softened, room temperature
1 cup Salted butter -- softened, room temperature
2 Large eggs
2 teaspoons Pure vanilla extract
Preheat oven to 300~F.
In a small bowl combine sugar and cinnamon for topping. Set aside.
In a medium bowl combine flour, soda and salt. Mix well with a wire whisk and set aside.
In a large bowl blend sugars with an electric mixer set at medium speed. Add the butter and mix to form a grainy paste. Scrape sides of bowl, then add eggs and vanilla extract. Mix at medium speed until light and fluffy. Add the flour mixture and blend at low speed just until combined. DO NOT OVERMIX. Shape dough into 1-inch balls and roll each ball in cinnamon-sugar topping. Place on ungreased cookie sheets, 2 inches apart. Bake for 18-20minutes.
Immediately transfer cookies with a spatula to a cool, flat surface.
But there's one more! Why not round it out with a batch of brownies??? So I cheated and baked up a batch from one of those that come out of a box. It was still good since I kicked it up a notch with some coffee powder.

As it turned out, my coworkers enjoyed the fruits of my labor the next day. And my husband built his Great Wall in our backyard.
Monday, May 18, 2009
Our Family Trip to Oahu


I'm a little behind my self-inflicted schedule on my first blog here but I wanted to start with a short blurb about our family vacation. Just a few short weeks ago, we flew out from SFO to Oahu in mid/April for a few days of nothing but swimming (for the kids), eating (for the adults) and a whole-lot-of-hangin'-out. It was a good time and a good break from our everyday grind.
Our most memorable food moments on the island were simple. Zippy's was our daily go-to joint. Our group faves included their mac salad, a weekly special of Chicken Katsu Curry on Saimin noodle soup, and their Zip Pac. On our last day there, we ventured over to the North Shore and gave in to the touristy places. Our quick two-hour drive consisted of Matsumoto's Shave Ice and a short stop at Giovanni's Shrimp truck. 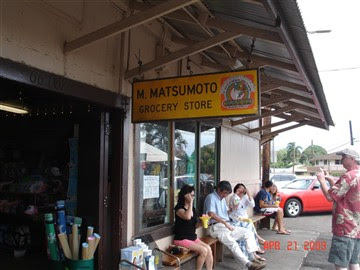
Giovanni's served up the best shrimp I've ever had in a long, long time! Their Shrimp Scampi consisted of white wine, garlic, butter, 12 large-sized shrimps laying in a bath of their sauce next to two large scoops of white rice. I think the picture says it all.... 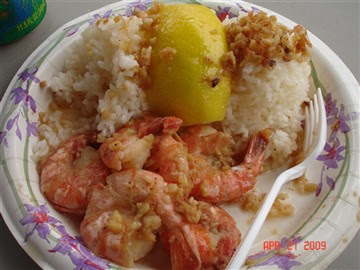


Lastly, a shout-out goes to Kin Chan Sushi Inc. This little sushi bar restaurant is located in Restaurant Row in Honolulu. Our friends recommended them and we enjoyed a very lively dinner there of extraordinary sushi. My 6 year old daughter inhaled two orders of Kin Chan's king salmon sashimi! This was one of those places that makes you stop and enjoy the fish as it melts in your mouth. We had everything from a pickled sardine to the best chu toro ever!
In short, it was a memorable vacation for all of us!
Subscribe to:
Posts (Atom)